
QrdyCraft for Canva — User Guide
New here? If you only have five minutes, read the Quick start and the Plans & billing sections — they cover ~90% of what you need.
QrdyCraft turns any photo, design element, or AI prompt into a printable mosaic sticker kit. The app drops three styles into your Canva design — finished colour art, a paint‑by‑number grid, and a cut‑and‑paste sticker sheet — and the sticker pieces come in as a real Canva group of shapes, so you can ungroup, recolour, or drag‑drop new fills onto each tile.
Table of contents
- Quick start
- The three tabs
- Create tab
- Result screen
- Gallery tab
- My tab
- Sticker sheet — what makes it special
- Plans & billing
- FAQ & troubleshooting
Quick start
- Open the app from the Canva editor's left sidebar → Apps → Qrdy Craft.
- Pick an input on the Create tab:
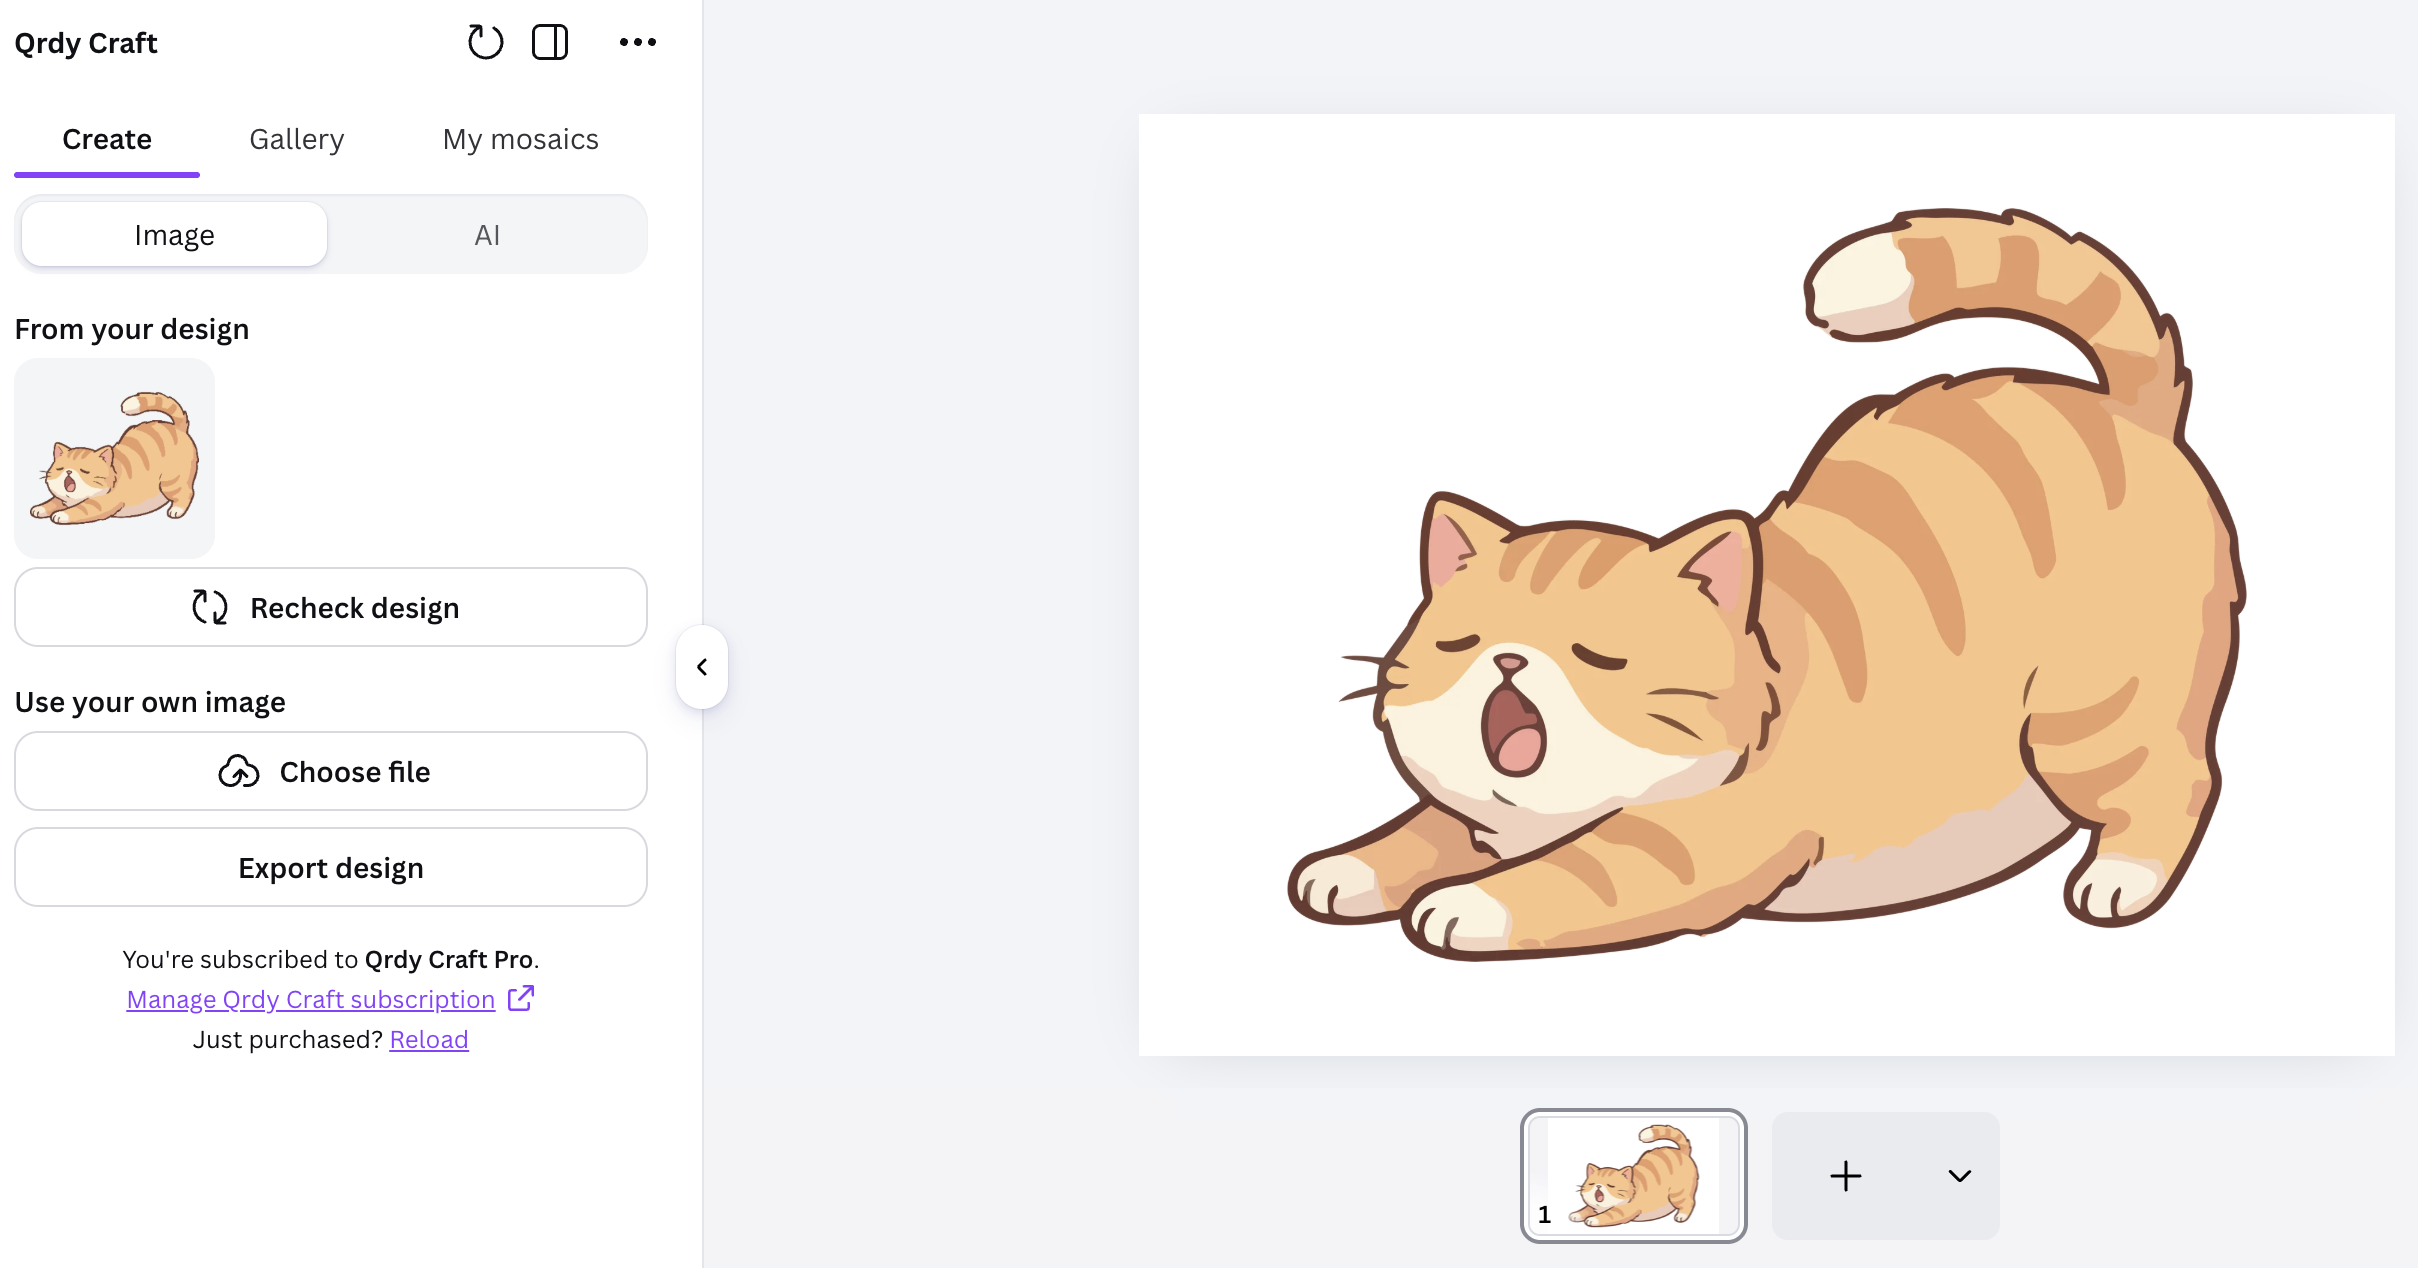
- tap an image or shape from the auto‑detected "From your design" grid, or
- upload a file (PNG / JPEG / WebP up to ~4 MB), or
- type an AI keyword such as
a butterfly with rainbow wings.
- Wait 5–10 seconds for the silhouette and the mosaic to generate. The Result screen opens automatically.
- Tap a preview tile to drop just that style into your design, or hit the big Add to design button to add every selected style at once.
The three tabs
QrdyCraft has three top‑level tabs, picked with the underlined navigation at the top of the app panel.
| Tab | Purpose |
|---|---|
| Create | Start a new mosaic from an image (your design / upload / export) or an AI prompt. |
| Gallery | Browse public mosaics other users have published and drop them straight into your design. |
| My | Re‑open mosaics you've already created — re‑edit them with new colours / difficulty, or re‑add to design. |
Create tab
The Create tab is two modes, switched with the Image | AI segmented control near the top.
Image mode
This mode generates a mosaic from an actual picture. There are three sources, listed in order of convenience:
1. From your design (auto‑detected)
As soon as you open the app, QrdyCraft scans the current Canva page and lists every image and shape it finds in a 3‑column grid under the heading "From your design". Tap any thumbnail → the app uses that source straight away. Non‑square art is shown whole (letter‑boxed), never cropped, so you always see the full picture.
If you change the page (add, delete, or replace elements) while the app panel is open, tap the Recheck design button below the grid to re‑scan.
2. Use your own image
Below the grid is the "Use your own image" section with two controls.
- When you have no element selected in the design, the first control is a regular Upload an image button — click to pick a PNG, JPEG, or WebP from your device.
- When you do have something selected in the canvas, the same button morphs into Use selection — one tap and that selected image becomes the source. No need to re‑upload what's already in your design.
The button below is Export design — it flattens the entire current Canva page into a single image and makes one mosaic from it. Useful when you've composed a scene from multiple elements and want the whole thing as one mosaic.
Image size limits
Large pictures are resized on your device before they leave Canva (down to a max 1024 px long edge, aspect preserved, never upscaled). If an image is still over ~4 MB after that, you'll see a friendly "This image is over 4 MB even after resizing — please choose a smaller or simpler image" alert. Most phone photos sit at 1–3 MB after the resize, comfortably under the limit.
AI mode
Tap AI in the segmented control. The whole "From your design" section disappears and is replaced with a single multi‑line text input.
- Keyword length: 2–200 characters.
- Web links (
http://,www.,.com) are not allowed — the AI is for visual descriptions, not URLs. - Examples that work well:
a butterfly with rainbow wings,a cute origami fox,a sunflower against a clear sky. - Short prompts (5–15 words) consistently produce cleaner silhouettes than long ones.
Press Generate with AI and the same loading screen opens.
Loading state
Whichever source you pick, the next 5–10 seconds show a loading screen with a progress bar and the message "Creating your shape… Usually 5–10 seconds. We're tracing the outline and finding clean edges."
Result screen
When the silhouette comes back, QrdyCraft turns it into a coloured mosaic and the Result screen takes over. This is where the kit personalisation happens.
Anatomy
From top to bottom:
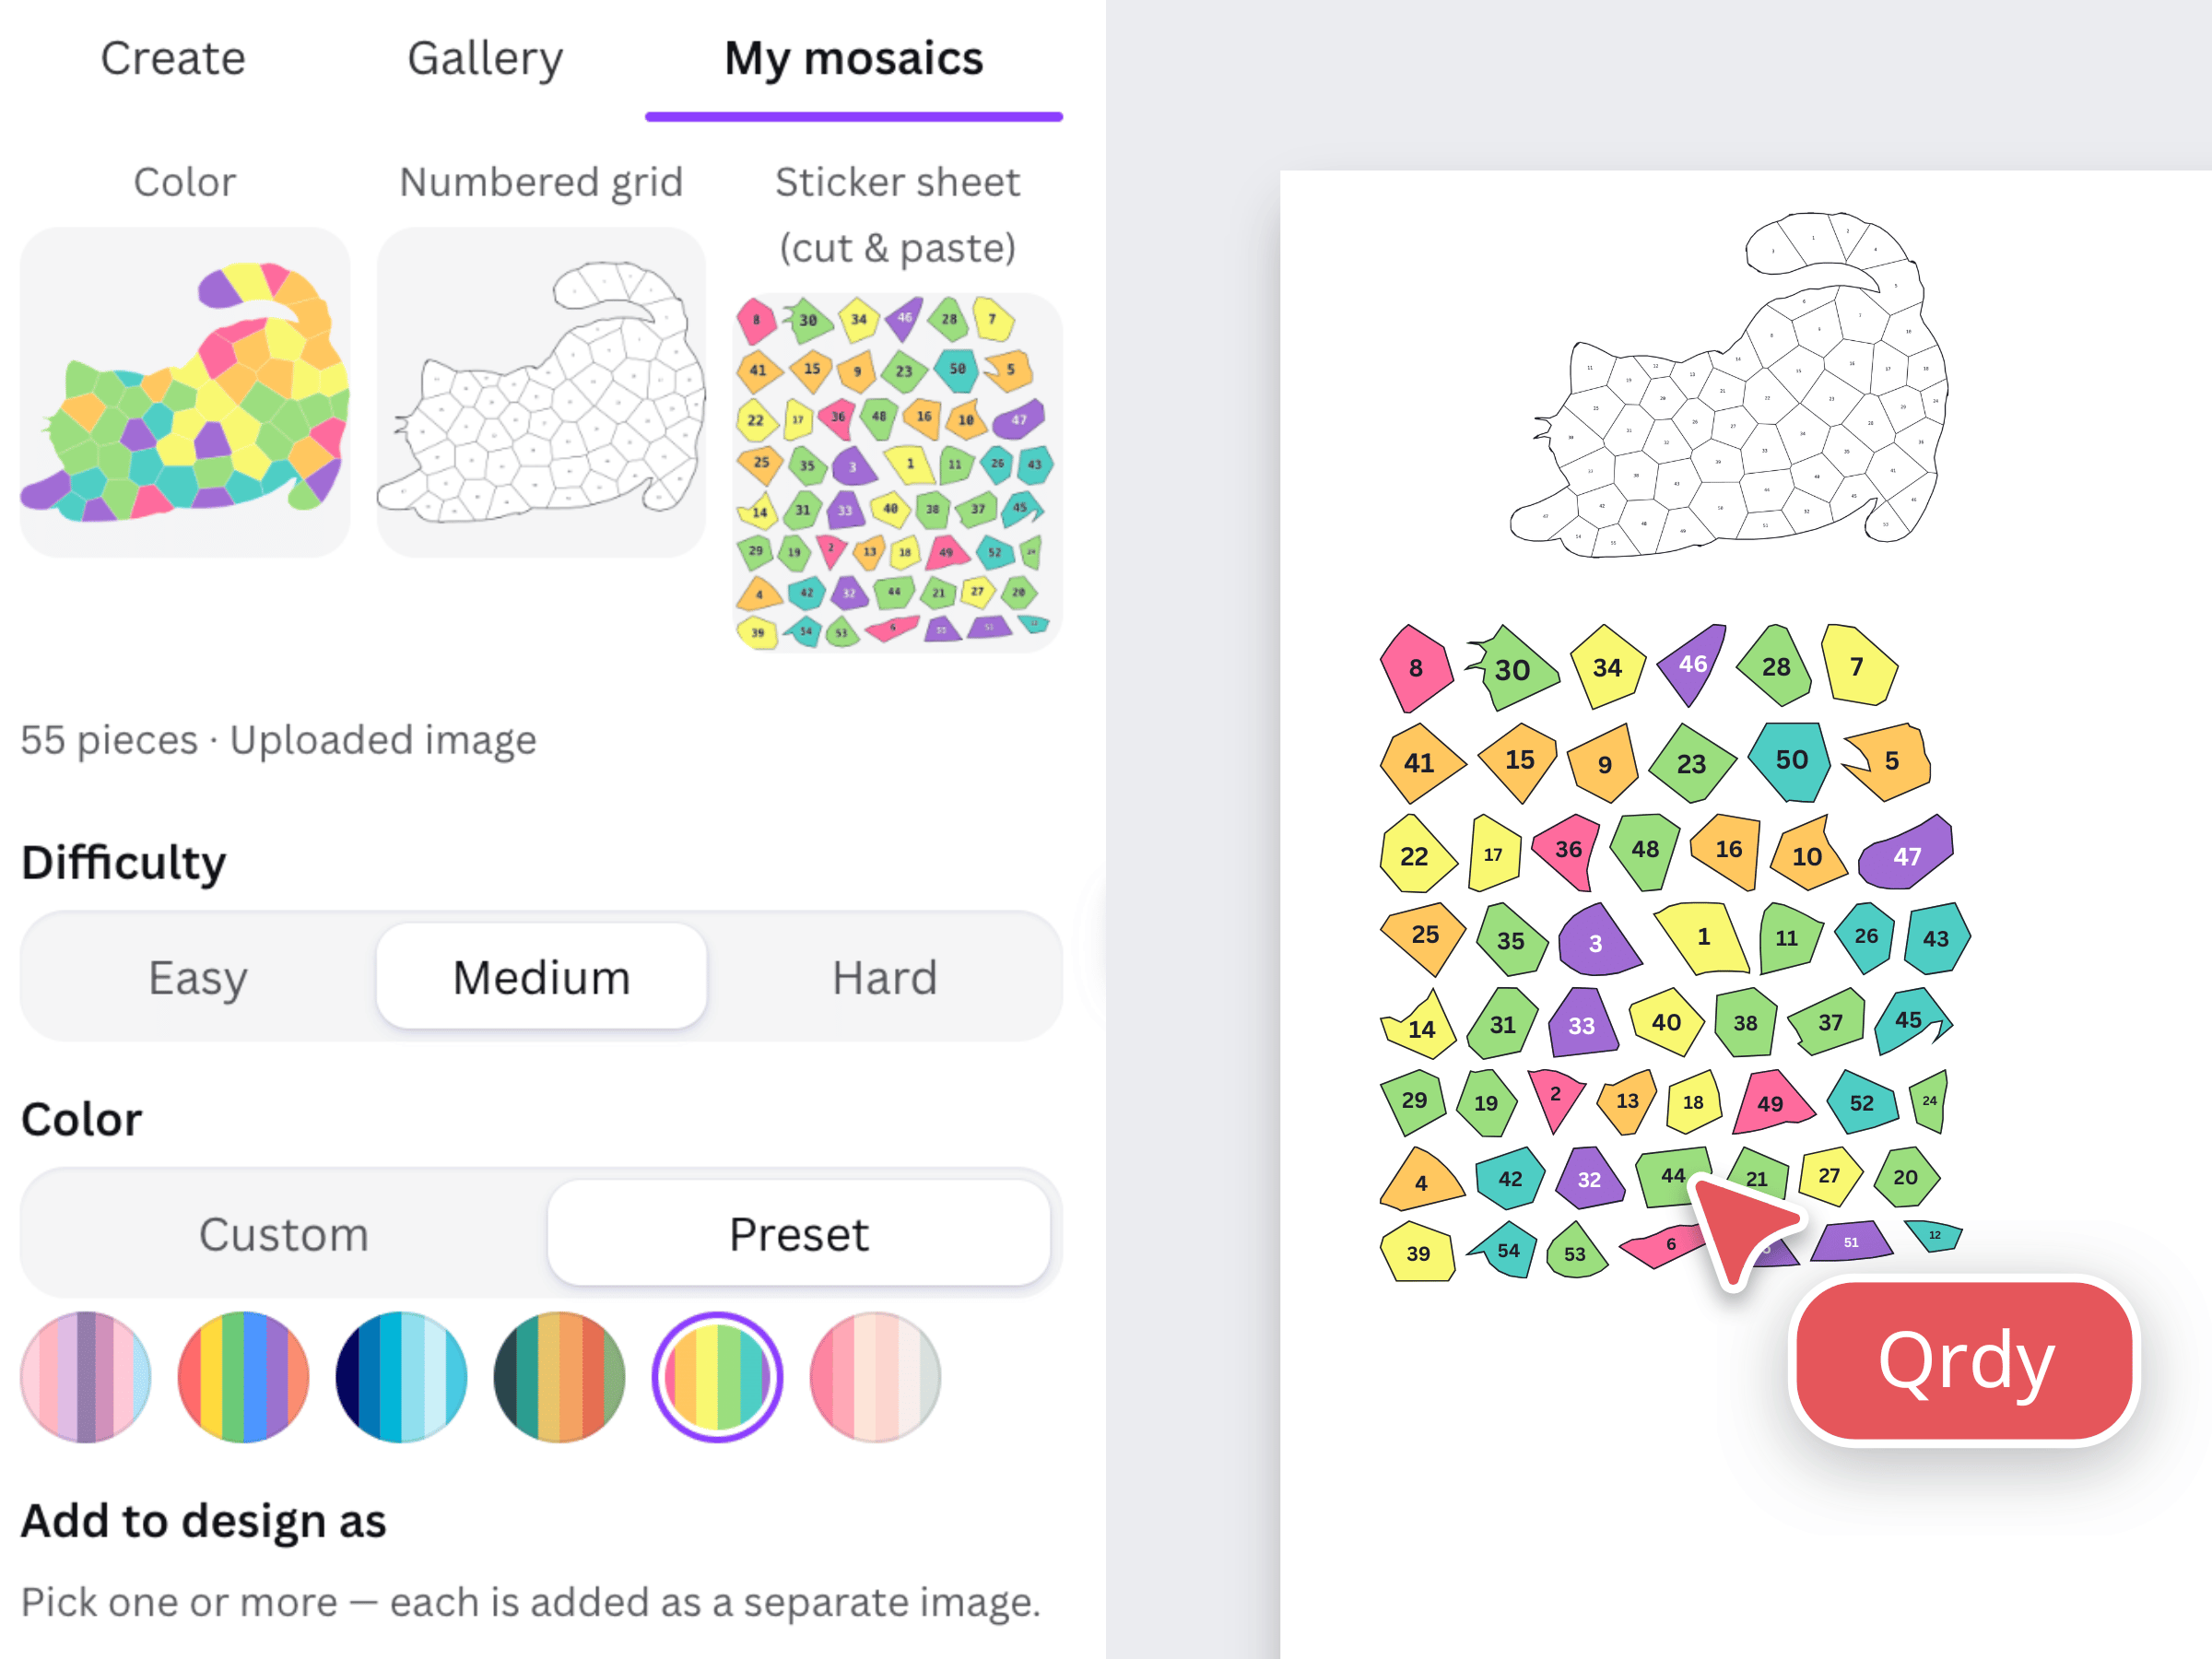
- Three preview tiles (Color / Numbered grid / Sticker sheet — see below). Tap any tile to add just that one style to the design instantly.
- A meta line — "N pieces · keyword" — with a small spinner that reads "Updating…" while the mosaic refreshes after a style tweak.
- Difficulty: Easy / Medium / Hard segmented control. Higher difficulty = more pieces / smaller tiles.
- Color picker with two sub‑tabs:
- Custom — five user‑editable swatches. Tap any swatch to open Canva's native colour selector (Document colours, Brand kit, Default colours, eye dropper, hex input).
- Preset — six curated palettes (Pastel, Vibrant, Ocean, Forest, Rainbow, Candy). Tap a swatch to apply.
- "Add to design as" — multi‑select checkboxes for the three render modes. All three are pre‑selected by default; you can untick the ones you don't want.
- Primary button — Add to design — adds every checked mode to your design (one image each, or a shape group for Sticker sheet).
- Secondary button — Add interactive play board — embeds the QrdyCraft play page right into your design as an interactive embed (works wherever Canva supports embeds).
- Tertiary link — See details on the web — opens this creation on the QrdyCraft website (you're signed in automatically), where you can download the print‑ready PDF kit.
- Bottom button — Create another — back to the Create input.
The three render modes (preview tiles)
Each tile is what your mosaic looks like when added in that style.
| Mode | What it is | When to use |
|---|---|---|
| Color | Finished mosaic art — coloured tiles separated by thin white borders. Looks like stained glass. | Final artwork. Drop into a poster or social post. |
| Numbered grid | The same outline, but each piece is white with a dark border and a number inside. Paint‑by‑number printable. | Hand out to kids / classroom — they colour the pieces themselves. |
| Sticker sheet (cut & paste) | Every piece arranged onto a sheet with a dark cut border + the same numbers. Print, cut along the lines, stick onto a numbered grid. | Crafts kit — kids cut and assemble the mosaic. |
Tap‑to‑add (single mode)
Tap any one tile → that single mode is added to your design straight away. A small spinner appears on the tile while it works; the other tiles stay calm. A toast at the top confirms — e.g. "Added Color to your design".
Difficulty & Color tweak (realtime)
Changing Difficulty or any Color swatch re‑generates the mosaic with the new settings. The preview tiles refresh and the "Updating…" spinner shows while it works — you always see the latest.
Custom palette deep dive
The Custom sub‑tab gives you 5 hex slots to define your own palette. Tap any swatch → Canva's solid‑colour flyout opens. Pick from Document / Brand / Default colours, or use the eye dropper. Your picks are saved on your device — next time you open the app the same custom palette is preloaded.
Style preferences persist
Your palette, custom colours, and "Add to design as" selection are remembered — reopening the app uses your last picks as the default. Difficulty is not remembered (it's usually per‑creation).
Add interactive play board
The Add interactive play board button embeds the QrdyCraft online player for this mosaic right into your Canva design. Anyone viewing the design — including the public if it's published — can play the mosaic puzzle inline. No login required for them.
Gallery tab
The Gallery tab is a public showcase. AI mosaics other users have generated are auto‑published here (uploads are never published — see privacy).
Layout
A 2‑column grid of square cards. Each card is a single composite thumbnail — the same mosaic shown in all three styles in one square (Color on the left half, Numbered grid top‑right, Sticker sheet bottom‑right). No titles, no clutter — a clean library feel.
Tap to add
Tap a card → all three styles are added to your design in sequence (Color first, then Numbered grid, then Sticker sheet). One tap, three images / a shape group, ready to lay out. A success toast confirms.
Web link
The footer of the Gallery is a small "Looking for more? Browse the full gallery on the web" link. It opens the full gallery on the QrdyCraft website, where you land already signed in.
My tab
This is where every mosaic you've ever generated lives.
Layout
A 2‑column grid of square Color‑only thumbnails (no captions). Tap to open.
Re‑edit (the killer feature)
Tap any tile → the Result screen reopens for that creation. All the same controls (Difficulty, Color, render modes, primary actions) are available. Change the palette → the mosaic re‑generates. Add to design with new settings.
This means a saved mosaic is not a static PNG — it's the full editable kit. Useful for refining a piece you made days ago, or for re‑skinning the same shape with different colours for different projects.
The bottom of the detail screen has a "Back to my mosaics" button instead of "Create another" so the affordance reads correctly in context.
Storage limits (free tier)
Free accounts keep up to 5 saved creations. When you create a 6th, the oldest one is automatically archived (still accessible on the web, but no longer in the My grid). Pro accounts have unlimited saved creations.
Sticker sheet — what makes it special
The Sticker sheet mode is the most interesting from a workflow point of view. When you add it to your design, QrdyCraft does not drop a flat PNG — it builds a real Canva group of shape elements, one shape per piece, each with:
- Its own vector outline = the piece's shape
- A colour fill that's a drop target
- A dark stroke = the cut line
- A number label centred on the piece
That means once you ungroup (Canva keyboard shortcut: Ctrl/Cmd + Shift + G) you can:
- Move individual pieces around independently
- Recolour any piece with Canva's colour picker like any built‑in shape
- Drag any Canva photo or video onto a piece to replace its fill (drop target)
- Resize / rotate / duplicate each piece individually
- Delete specific pieces without affecting the others
Fallback
A handful of Canva design types (like Docs) don't accept shape or group elements. On those, the Sticker sheet adds as a flat PNG instead — you still get a usable result. The other two modes (Color, Numbered grid) always add as flat PNGs because they're meant to be cohesive artwork, not lift‑apart bits.
Plans & billing
QrdyCraft is subscription‑based, not credit‑based. There's no wallet; there are no top‑ups. Free users get a small monthly allowance; Pro users get unlimited use.
| Free | Pro (monthly / annual) | |
|---|---|---|
| AI generations / month | 3 | Unlimited |
| Image uploads / month | Unlimited | Unlimited |
| Saved creations | 5 (oldest auto‑archived) | Unlimited |
| Watermark on print PDF | Yes | No |
| Sticker sheet shape group | Yes | Yes |
Credit counter (free users)
At the bottom of the Create tab, free users see: "Use 1 of 3 QrdyCraft credits. Need more? Buy QrdyCraft credits". The counter reflects the cost of the next generate (1 credit) and the credits you have left this month. Out of credits → it flips to a critical alert.
Out‑of‑credits behaviour
Tapping any source (image, upload, AI keyword) while out of credits triggers a clear critical alert at the top of the Create input: "No QrdyCraft credits remaining — You've used all your QrdyCraft credits this month. Buy QrdyCraft credits". The alert is dismissable.
Upgrade flow (no in‑app payment)
Canva forbids in‑app purchases for third‑party apps, so the Buy QrdyCraft credits link opens the QrdyCraft pricing page in a new browser tab. After you pay, your Canva account is upgraded automatically — no need to "link" anything.
Just purchased? Reload
Below the Buy link there's a small "Just purchased? Reload" link. After you come back from the web (post‑checkout), tap it to refresh your billing status without restarting the app. If the purchase processed, the panel flips to the Pro variant immediately.
Pro variant
For Pro accounts the bottom of every relevant screen reads: "You're subscribed to QrdyCraft Pro. Manage QrdyCraft subscription". The manage link opens your account page on the QrdyCraft website (you're signed in automatically).
Privacy
- Uploads are never published. Whether or not an upload was traceable as a real person's photo, the resulting mosaic is private to you.
- AI‑generated mosaics are auto‑public — they enter the gallery. They're derived from text prompts, never from real photos.
- QrdyCraft does not store your original photo or any PDF — only the abstract shape outline.
FAQ & troubleshooting
Sticker sheet adds as a flat PNG instead of shapes
The current design type (Canva Docs, for instance) doesn't support shape or group elements. The app falls back to a flat PNG so you still get a usable result. Try the same flow on a Presentation, Poster, or Instagram Post and the shape group works.
My image upload says "over 4 MB even after resizing"
Some heavily detailed images can resist compression. Use Canva's own Uploads panel to add the picture first, then come back to QrdyCraft and use it via the "From your design" grid — the in‑Canva storage handles large files for us.
The mosaic looks pixelated when scaled
The preview is rendered at 2× for crispness, which is plenty for screen and normal prints. For oversized posters, use the print‑ready PDF from the website (See details on the web → download) — it's a true vector kit that scales to any size.
I can't see the Buy / Reload / Manage links on iOS
Some Canva surfaces (notably iOS in‑app) block external payment links. In that case QrdyCraft shows a warn alert: "QrdyCraft can only be managed in a web browser. Sign in to canva.com and open QrdyCraft again." Use Canva on a desktop browser to handle billing.
Support & contact
- Bug reports & feature requests: contact the team via the email on the Canva marketplace listing.
- Privacy & terms: read our Terms of Service.
Happy mosaic‑ing! 🎨